Alert Notifications
CrossTrade fires alerts for the things you actually need to know about. Auto-flatten events, reconnect failures, payment problems, position activity, broker auth expiry, and more. Every alert lands in the bell tray at the top of your dashboard automatically. From there, you can also have alerts sent out to one or more delivery destinations of your choice.
Overview
There are five places an alert can go:
| Destination | Plan | Default | What it does |
|---|---|---|---|
| In-app tray | All plans | Always on | Every alert is recorded and shown in the bell tray. |
| Pro | Off (opt-in) | Sends a styled HTML email to your account email address. | |
| Discord | Pro | Off (opt-in) | Posts a rich embed to a Discord channel via a server webhook. |
| Telegram | Pro | Off (opt-in) | Sends a formatted message via a bot you create with @BotFather. |
| HTTP Webhook | Pro | Off (opt-in) | POSTs the raw alert as JSON to any URL you control. |
The in-app bell tray is on for every account from day one. There's nothing to set up, and it's free on every plan. The four outbound destinations are part of the Pro plan. If you're on a free or trial tier, picking an outbound destination shows an upgrade prompt instead of the configuration form.
You can enable any combination of outbound destinations. For example, in-app plus Telegram plus a custom webhook to your own logging server. CrossTrade will send to all of them in parallel.
Every destination has its own alert-type filter. By default, an enabled destination receives every alert that's enabled in your in-app settings. If you want, say, Telegram to only get position activity and Discord to only get critical events, that's a per-destination setting on each one.
Where to configure
Open My Account → Alerts from the user menu. The page shows one card titled Alert Notifications with a card-styled dropdown selector at the top. The dropdown lists every destination (In-App, Email, Discord, Telegram, HTTP Webhook) with a short description and a status pill (Always On, Enabled, Disabled, or Pro). Pick one and the rest of the panel updates to that destination's configuration plus its alert-type list.
Everything below the dropdown auto-saves. There is no Save button. As soon as you flip a switch or tab away from a credential field, the change persists.
Each outbound destination shows the same set of controls in a fixed order:
- A description of what the channel does.
- A top action row with three controls together:
- Enable switch turns delivery on or off. A switch can only flip on after a successful Send Test (see below).
- Send Test fires a one-off test alert using whatever is currently in the form. It does not save and does not change the Enable state.
- Clear removes the destination from your account entirely. The page reloads with the form reset.
- Credentials for the destination (a webhook URL for Discord, a bot token for Telegram, etc.). For email, just a read-only display of your account email.
- An alert types list that mirrors the in-app list, but only mutes types for this destination. Default is "everything on."
Test-before-enable
The Enable switch will not flip on until Send Test has succeeded for the current credentials. If you try to toggle it on without a successful test, it bounces back off immediately and you get a "Run a successful Send Test before enabling" error.
This catches the most common configuration mistakes (wrong webhook URL, wrong chat ID, blocked endpoint) before any real alerts go anywhere. Once Send Test succeeds, the switch unlocks for that session and a saved-enabled destination stays unlocked across refreshes.
How the gates fit together
When CrossTrade decides whether to send an alert through a particular destination, it checks three things:
- Is the alert type enabled in-app? Controlled by the In-App entry in the dropdown. If it's off there (and the type isn't a critical), the alert is silenced everywhere.
- Is the destination enabled and configured? Controlled by the Enable switch and the credentials on the destination's panel.
- Is the type enabled for this destination specifically? Controlled by the per-destination type list on the same panel. Default is "everything on."
All three must pass for an outbound alert to fire on a given destination. Critical alerts (payment failures, security events, account locks, broker auth expiry) bypass the per-channel filter and the in-app toggle. They always reach the in-app bell tray and any enabled outbound destination.
In-App Alerts (default, free)
Nothing to configure. In-App is the default selection in the dropdown and shows the master alert-type list for the bell tray. Toggling a type off here mutes it everywhere; toggling it back on restores it everywhere. Toggles save automatically.
Click the bell at the top of the dashboard to read or clear unread alerts. Critical alerts always reach the bell tray, even if their per-type toggle is off.
If you want to wipe the entire history, the Alerts History card on the right of the Alerts tab has a "Delete All Alerts" button.
Email
Email goes to your account email address. The same address you log in with. There is no editable address field on the destination, so a compromised account can't redirect alerts to a third party. If you want alerts at a different address, change your account email in the General tab (which requires re-verification).
Set it up
- Open My Account → Alerts and pick Email from the dropdown.
- Confirm the Sends to: address shown is the one you want.
- Click Send Test. Within a few seconds you should receive a "CrossTrade Test Alert" email styled to match the dashboard.
- Once the test lands, flip the Enable switch on. The switch refuses to flip on until Send Test has succeeded.
- (Optional) Toggle off any alert types in the list below to mute them for email only. For example, mute Position Activity if you only want bigger events emailed. Toggles save automatically.
Tips
- Add
noreply@crosstrade.io(or whichever sender shows up in your test) to your address book or safe-senders list so alerts don't end up in spam. - The subject line is the alert title (for example,
Auto-Flatten Fired - Sim101). Filter rules in your email client work normally on these. - Want alerts at multiple addresses? Use a distribution list or forwarding rule on your end. CrossTrade only sends to the account email.
Discord
Discord delivery uses a channel webhook, which is built into Discord and doesn't require giving CrossTrade a bot or any account credentials. The webhook URL is the only thing you ever paste.
Create a Discord webhook
-
In Discord, open the server where you want alerts to land.
-
Hover over the channel (e.g.,
#trading-alerts) and click the gear icon to open Edit Channel.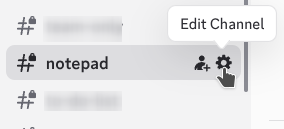
-
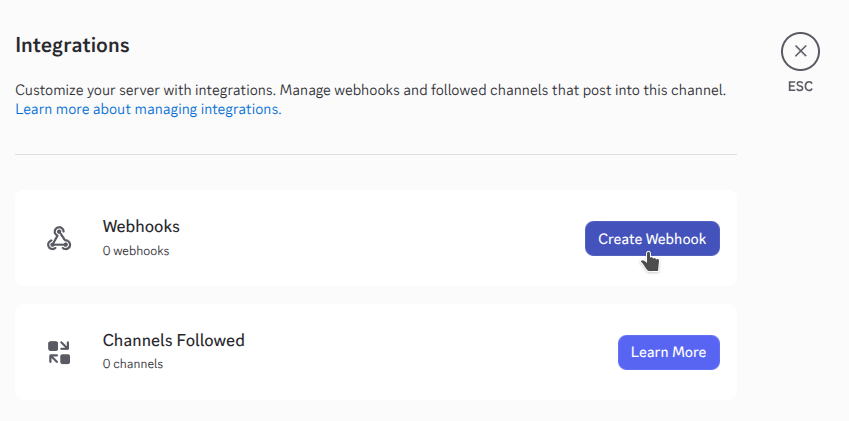
In the channel settings sidebar, click Integrations.

-
Under Webhooks, click Create Webhook (or New Webhook if you already have one).
-
Give the webhook a name. Whatever you like; this is what shows as the message author.
-
Click Copy Webhook URL. The URL looks like
https://discord.com/api/webhooks/123456789/abc-def-....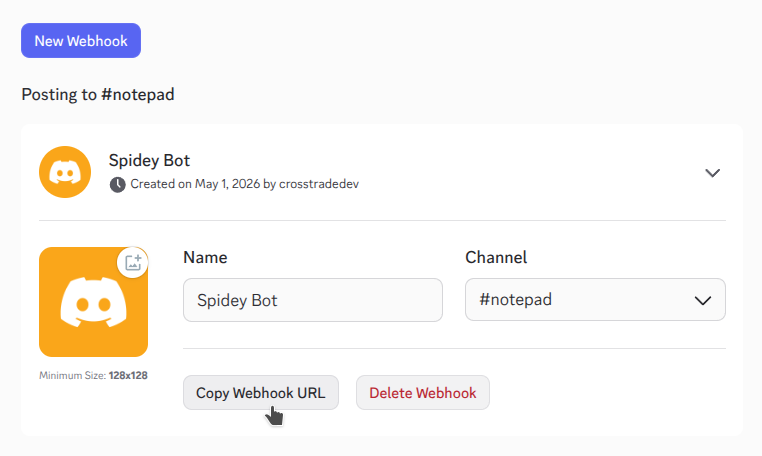
-
Click Save Changes in Discord.
Wire it into CrossTrade
- Open My Account → Alerts and pick Discord from the dropdown.
- Paste the webhook URL into Webhook URL. Tab away from the field; the URL is auto-saved on blur.
- Optionally set Bot username to override what shows as the post author (default is "CrossTrade"). Saves on blur.
- Click Send Test. A test embed should appear in your Discord channel almost immediately.
- Once the test lands, flip Enable on. The switch refuses to flip until Send Test has succeeded for the current URL.
- (Optional) Toggle off any alert types in the list below to narrow what this Discord channel receives.
Tips
- The post is a Discord rich embed: title, message, color-coded by alert type, account name as a field, and details (instrument, P&L, etc.) as inline fields.
- Treat the webhook URL like a password. Anyone who has it can post to that channel as your webhook. Don't paste it into public chats.
- To stop alerts going to a channel, flip the Enable switch off (auto-saves), or click Clear to forget the credentials entirely. Either works.
Telegram
Telegram delivery uses your own bot. You create the bot once with @BotFather and paste the token into CrossTrade. CrossTrade looks up your chat with the bot automatically on the first Send Test, so there's only one value to copy.
Step 1: Create a bot
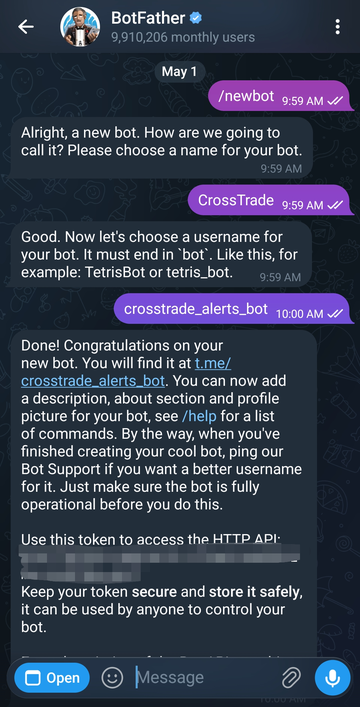
- Open Telegram and start a chat with
@BotFather. - Send
/newbot. BotFather asks for a name (any) and a username (must end inbot, e.g.,myalerts_bot). - BotFather replies with two things: an API token that looks like
123456789:ABCdef-GhI...and a link to your bot's chat (t.me/myalerts_botor similar). Save the token. You'll paste it into CrossTrade.
Step 2: Press Start in the bot chat
This step is mandatory. Telegram doesn't let bots send messages to people who haven't talked to them first, and CrossTrade's auto-lookup needs at least one message from you to know which chat to target.
- Click the bot link BotFather just gave you (or search for your bot's username in Telegram and open the chat).
- Press the big blue Start button at the bottom of the chat. If it doesn't appear (because you've used the bot before), just send any message —
hiworks fine.
That's it. CrossTrade will pick the chat up on the next step.
Step 3: Wire it into CrossTrade
-
Open My Account → Alerts and pick Telegram from the dropdown.
-
Paste the Bot token (the long
:-separated string from BotFather). Tab away — the token saves automatically. -
Click Send Test. CrossTrade calls Telegram's
getUpdatesAPI, finds the chat where you pressed Start, sends a test message, and saves the chat ID for future use. The test message should arrive in Telegram within a second or two.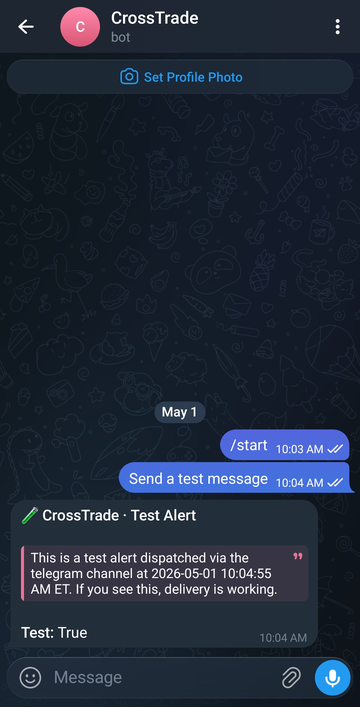
-
Once the test lands, flip Enable on. The switch refuses to flip until Send Test has succeeded.
-
(Optional) Toggle off any alert types in the list below to narrow what Telegram receives.
If you forget to press Start in step 2, the test fails with "No messages found for this bot. Open the chat with your bot and press Start (or send any message), then try Send Test again." Press Start, retry the test, and you're set.
Tips
- The token is sensitive — anyone with it can post as your bot. The field hides it by default; click the eye icon to reveal it if you need to verify the value.
- To send to a different chat: in CrossTrade, click Clear to reset the destination, then start over. The acquired chat ID is tied to whichever chat last messaged the bot.
- For a public Telegram channel: add the bot as an admin to the channel and post any message in the channel. CrossTrade's lookup picks the channel up on the next Send Test.
- For a group: add the bot to the group and have someone send any message there. Same lookup logic applies.
HTTP Webhook (custom endpoint)
The HTTP Webhook destination POSTs the alert as JSON to any URL you control. Useful for integrating with your own logging system, a Slack incoming webhook, IFTTT or Zapier, a homelab dashboard, a paging service, or anything else that speaks HTTP.
Set it up
- Open My Account → Alerts and pick HTTP Webhook from the dropdown.
- Enter your Endpoint URL (must start with
http://orhttps://). Tab away to auto-save. - Pick a Method. POST is the default and works for almost everything. PUT and PATCH are available if your endpoint requires them. Auto-saves on change.
- Optionally enter a Shared secret. When set, every request includes an
X-XTrade-Signatureheader so you can prove the request actually came from CrossTrade. See "Verifying signatures" below. Auto-saves on blur. - Click Send Test. CrossTrade fires a JSON
test_alertPOST at your endpoint and shows the response status or error in the toast. - Once the test returned a 2xx, flip Enable on. The switch refuses to flip until Send Test has succeeded for the current URL and method.
- (Optional) Toggle off any alert types in the list below to narrow what your endpoint receives.
Request shape
The request body is JSON of the form:
{
  "type":      "auto_flatten",
  "title":     "Auto-Flatten Fired - Sim101",
  "message":   "Account Manager auto-flattened positions on Sim101...",
  "account":   "Sim101",
  "details":   { "reason": "Daily loss limit reached (-$200)" },
  "timestamp": 1714060800
}
Headers always included:
| Header | Purpose |
|---|---|
Content-Type | application/json |
User-Agent | CrossTrade-Alerts/1.0 |
X-XTrade-Type | The alert type (e.g., auto_flatten) for quick routing. |
X-XTrade-Timestamp | Unix seconds when the request was built. |
X-XTrade-Signature | Only present if you set a shared secret. See below. |
Verifying signatures
If you set a shared secret, CrossTrade signs the raw request body with HMAC-SHA256 and sends the hex digest in X-XTrade-Signature as sha256=<digest>. To verify on your side (Python example):
import hmac, hashlib

def verify(body_bytes: bytes, signature_header: str, secret: str) -> bool:
    expected = 'sha256=' + hmac.new(secret.encode(), body_bytes, hashlib.sha256).hexdigest()
    return hmac.compare_digest(expected, signature_header or '')
Reject any request whose signature doesn't match. That's how you keep random internet traffic from posting fake alerts to your endpoint.
Retries
- 2xx responses are treated as success.
- 4xx responses are not retried. The assumption is your endpoint deliberately rejected the request (bad auth, malformed input on your side, etc.). Fix the URL or your handler and the next alert will go through.
- 5xx, timeouts, network errors are retried with exponential backoff up to five attempts. Long enough to ride out a brief outage, short enough that a permanently broken endpoint doesn't pile up forever.
Per-destination filters
Every outbound destination has its own optional types filter in the alert-type list on its panel. The list mirrors the in-app card, but the toggles only mute types for that specific destination. Toggles auto-save.
By default, every type is on for every destination, so configuring a destination doesn't require flipping a dozen extra switches. You opt out per channel only when you want to.
Example: you're on Pro and have all four destinations enabled.
- In-App: everything on (default).
- Email: filter mutes Position Activity. Result: emails for everything except open/close events.
- Discord: filter mutes everything except Critical and Trading. Result: Discord channel stays focused on stuff you'd act on.
- Telegram: no filter changes. Result: Telegram gets everything that's enabled in-app.
- Webhook: no filter changes. Result: webhook gets everything that's enabled in-app.
If you turn an alert type off on the In-App panel, it disappears from every destination. That's the global gate.
Troubleshooting
| Symptom | Likely cause |
|---|---|
| Picking a destination shows an upgrade prompt | You're on a non-Pro plan. Outbound destinations are gated by the Pro plan; In-App stays free. |
| Enable switch flips back off immediately | You're trying to enable a destination without first running a successful Send Test. Run the test, then flip Enable. |
| Test passes, but real alerts never arrive | The alert type is muted on the In-App panel, in the per-destination filter, or the Enable switch is off. |
| Email lands in spam | Add the sender to your address book or safe-senders list. |
| Email goes to the wrong address | Email is bound to your account email. Change it in the General tab. |
| Discord test fails with "missing or invalid webhook_url" | URL didn't start with https://discord.com/api/webhooks/. Re-copy from Discord. |
| Telegram test fails with "No messages found for this bot" | You haven't pressed Start in the bot chat yet. Open the bot's chat and press Start (or send any message), then retry. |
| Telegram test fails with "chat not found" or "Forbidden" | The chat the bot last heard from is no longer accessible (you blocked it, the bot was kicked from the group, etc.). Click Clear in CrossTrade, talk to the bot again, then test. |
| Webhook test returns 401 or 403 | Your endpoint is rejecting unauthenticated requests. Set a shared secret and check it on your side. |
| Webhook test times out | Endpoint took longer than 15 seconds to respond. Make sure your handler returns quickly and does its work asynchronously. |
If a destination is misbehaving and you don't have time to debug it right now, flip its Enable switch off (it auto-saves immediately). Your filters and credentials stay intact for when you come back.