How to Automate Bitcoin Futures Trading from TradingView to NinjaTrader 8
This guide will cover how you can automate your BTC trading from TradingView to NinjaTrader through CrossTrade

Bitcoin (BTC) has revolutionized the financial world, offering traders unique opportunities in the rapidly growing cryptocurrency market.
While spot trading BTC on exchanges like Coinbase or Binance is common, trading Bitcoin futures provides an alternative approach with distinct advantages. In this guide, we'll explore how to trade BTC futures using NinjaTrader, a powerful trading platform that integrates seamlessly with CrossTrade for streamlined order execution and risk management.
Automating your trades by integrating TradingView alerts with NinjaTrader 8 through CrossTrade allows you to execute orders efficiently and without constant manual input. This guide will walk you through the entire process of setting up automated Bitcoin futures trading.
Understanding BTC Futures Contracts
NinjaTrader supports Bitcoin futures contracts listed on the CME (Chicago Mercantile Exchange). These contracts are settled in cash, meaning traders do not need to hold actual BTC. The two main BTC futures contracts available are:
- BTC (Full Contract) – Represents 5 Bitcoin per contract
- MBT (Micro Bitcoin Futures) – Represents 1/10th of a Bitcoin per contract
Micro Bitcoin futures (MBT) are ideal for smaller traders looking to manage risk more effectively.
Step 1: Installing CrossTrade to Send Orders to NinjaTrader 8
CrossTrade acts as the middleware that translates TradingView alerts into executable orders on NinjaTrader 8.
- Sign up for an account – Once you create your account, you will be prompted to download the XT Add-On.
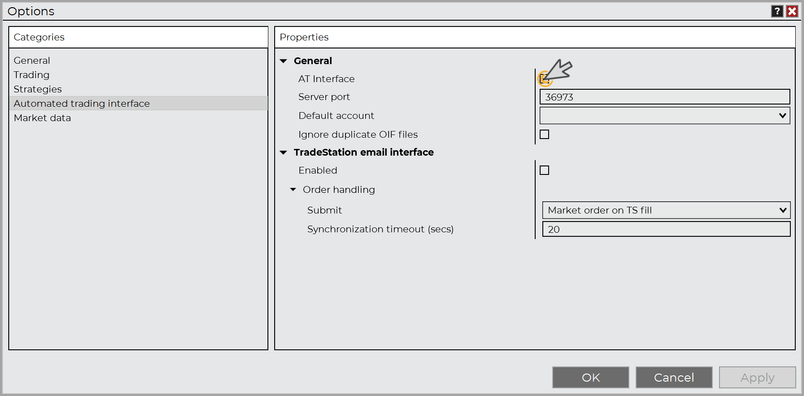
- Install CrossTrade - Inside NT8, go to Tools> Options> NinjaScript Add-On
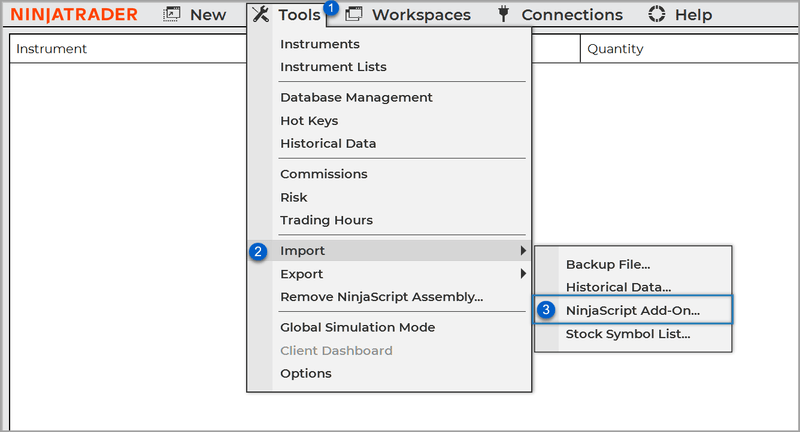
- Enable the ATI Setting - Click Tools> Options> Automated Trading Interface and then check the box for AT Interface. This will ensure orders are submitted to NT8 properly.
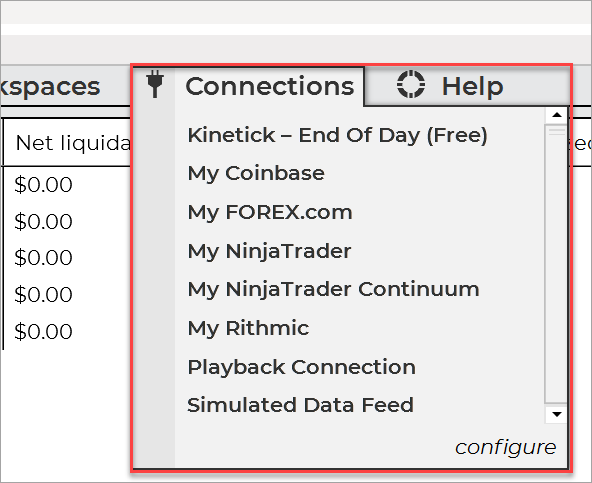
- Connect to a Data Provider – You’ll need a futures data provider like CQG, Rithmic, or a NinjaTrader data feed to access live Bitcoin futures data.
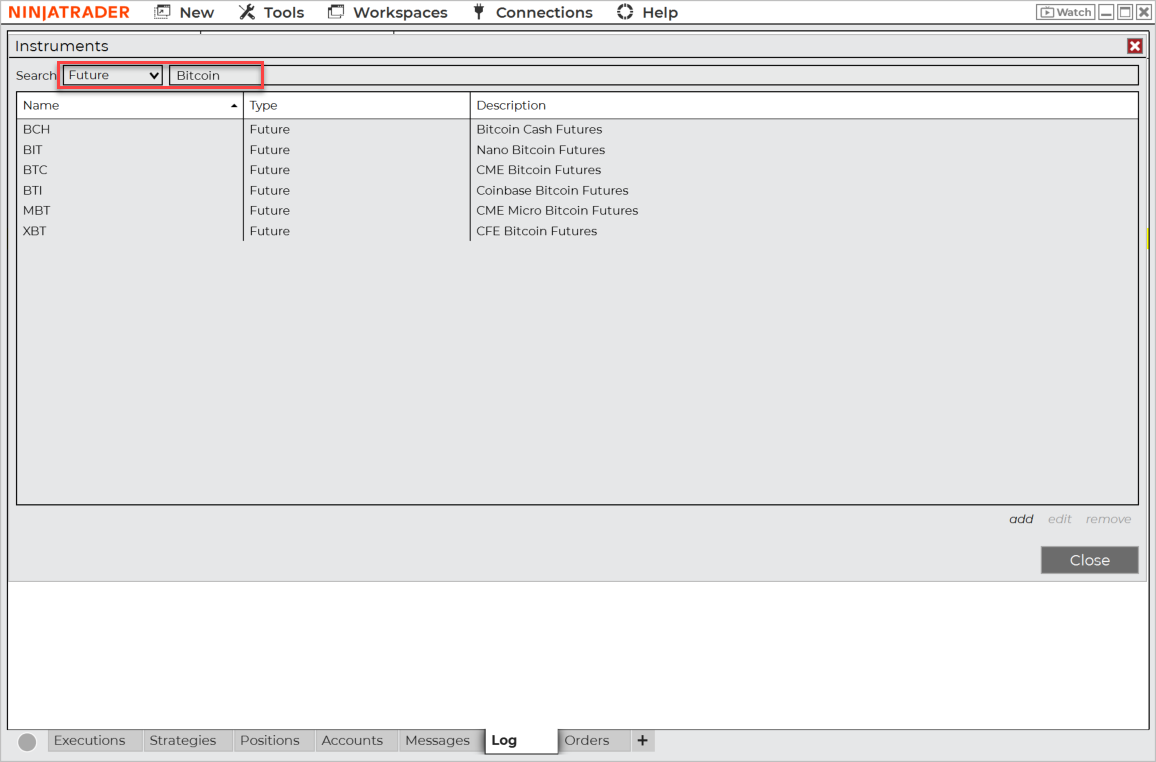
- Add BTC Futures to Instruments List– Once your data provider is connected:
- Open NinjaTrader 8.
- Navigate to Control Center > Tools > Instruments.
- Select Futures and then Search for Bitcoin to locate the BTC (Full Contract) or MBT (Micro Bitcoin Futures).
- Add to your Instruments List
Step 2: Connecting TradingView Alerts to CrossTrade
TradingView allows you to send alerts via webhooks, which will be directed to CrossTrade for order execution.
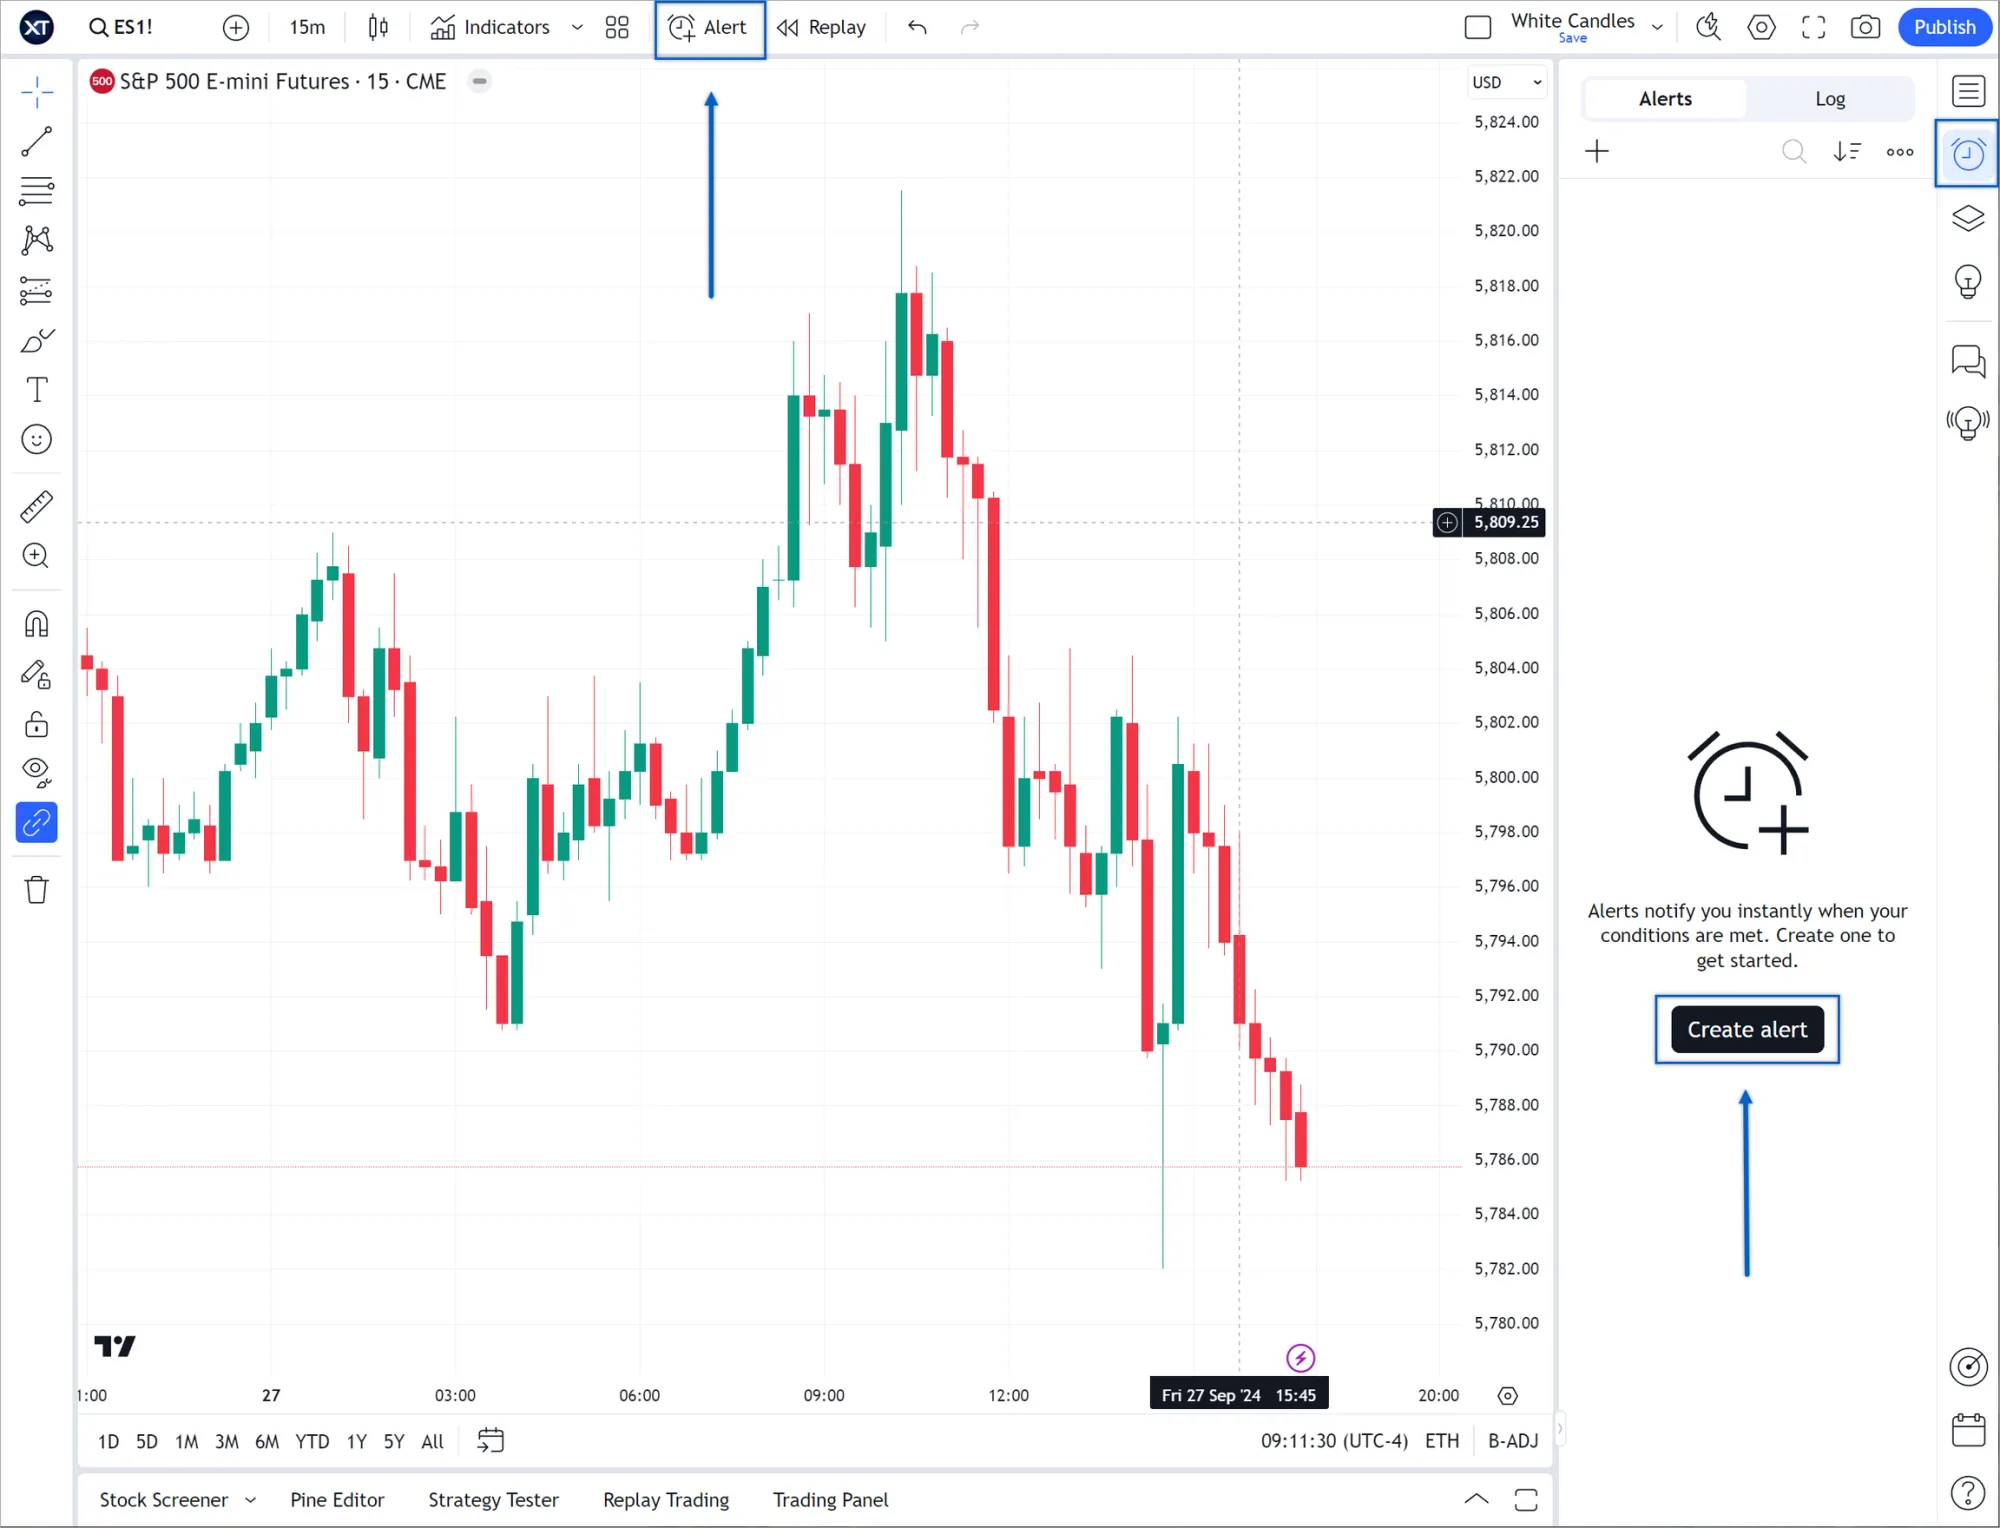
- Go to TradingView’s Alert Tab – Click on the alert icon and create a new alert.
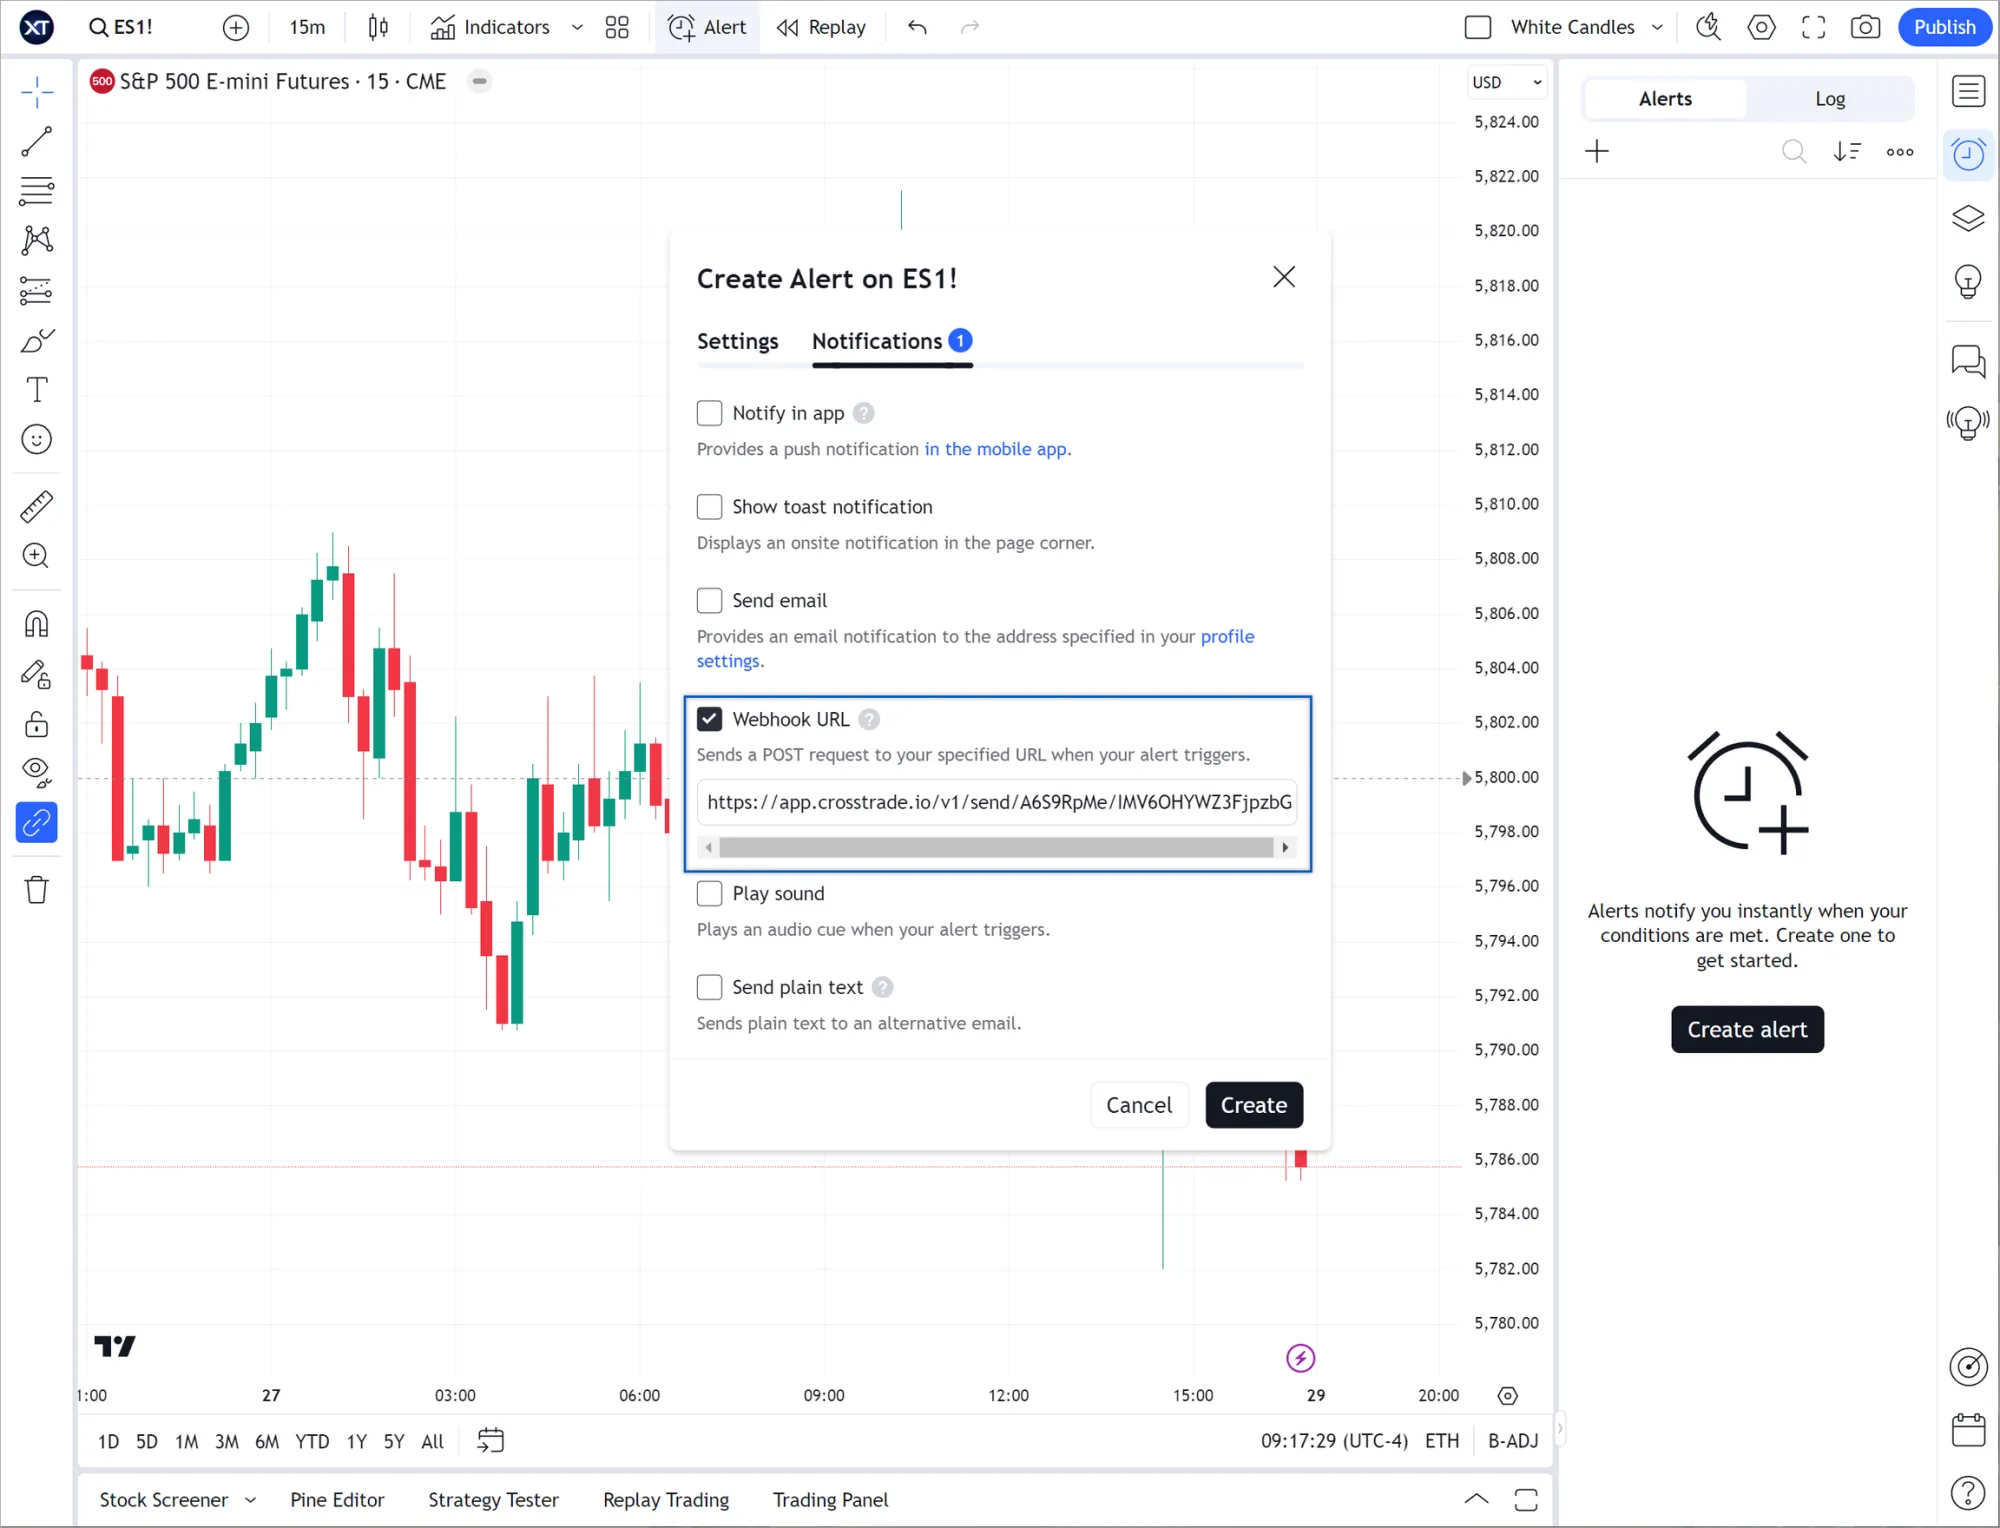
- Enable Webhook URL – On the Notifications tab, check the ‘Webhook URL’ box and enter the CrossTrade webhook URL provided in your My Account page.
- Set Trigger Conditions – Choose your preferred BTC indicator or strategy’s buy/sell signals as the trigger.
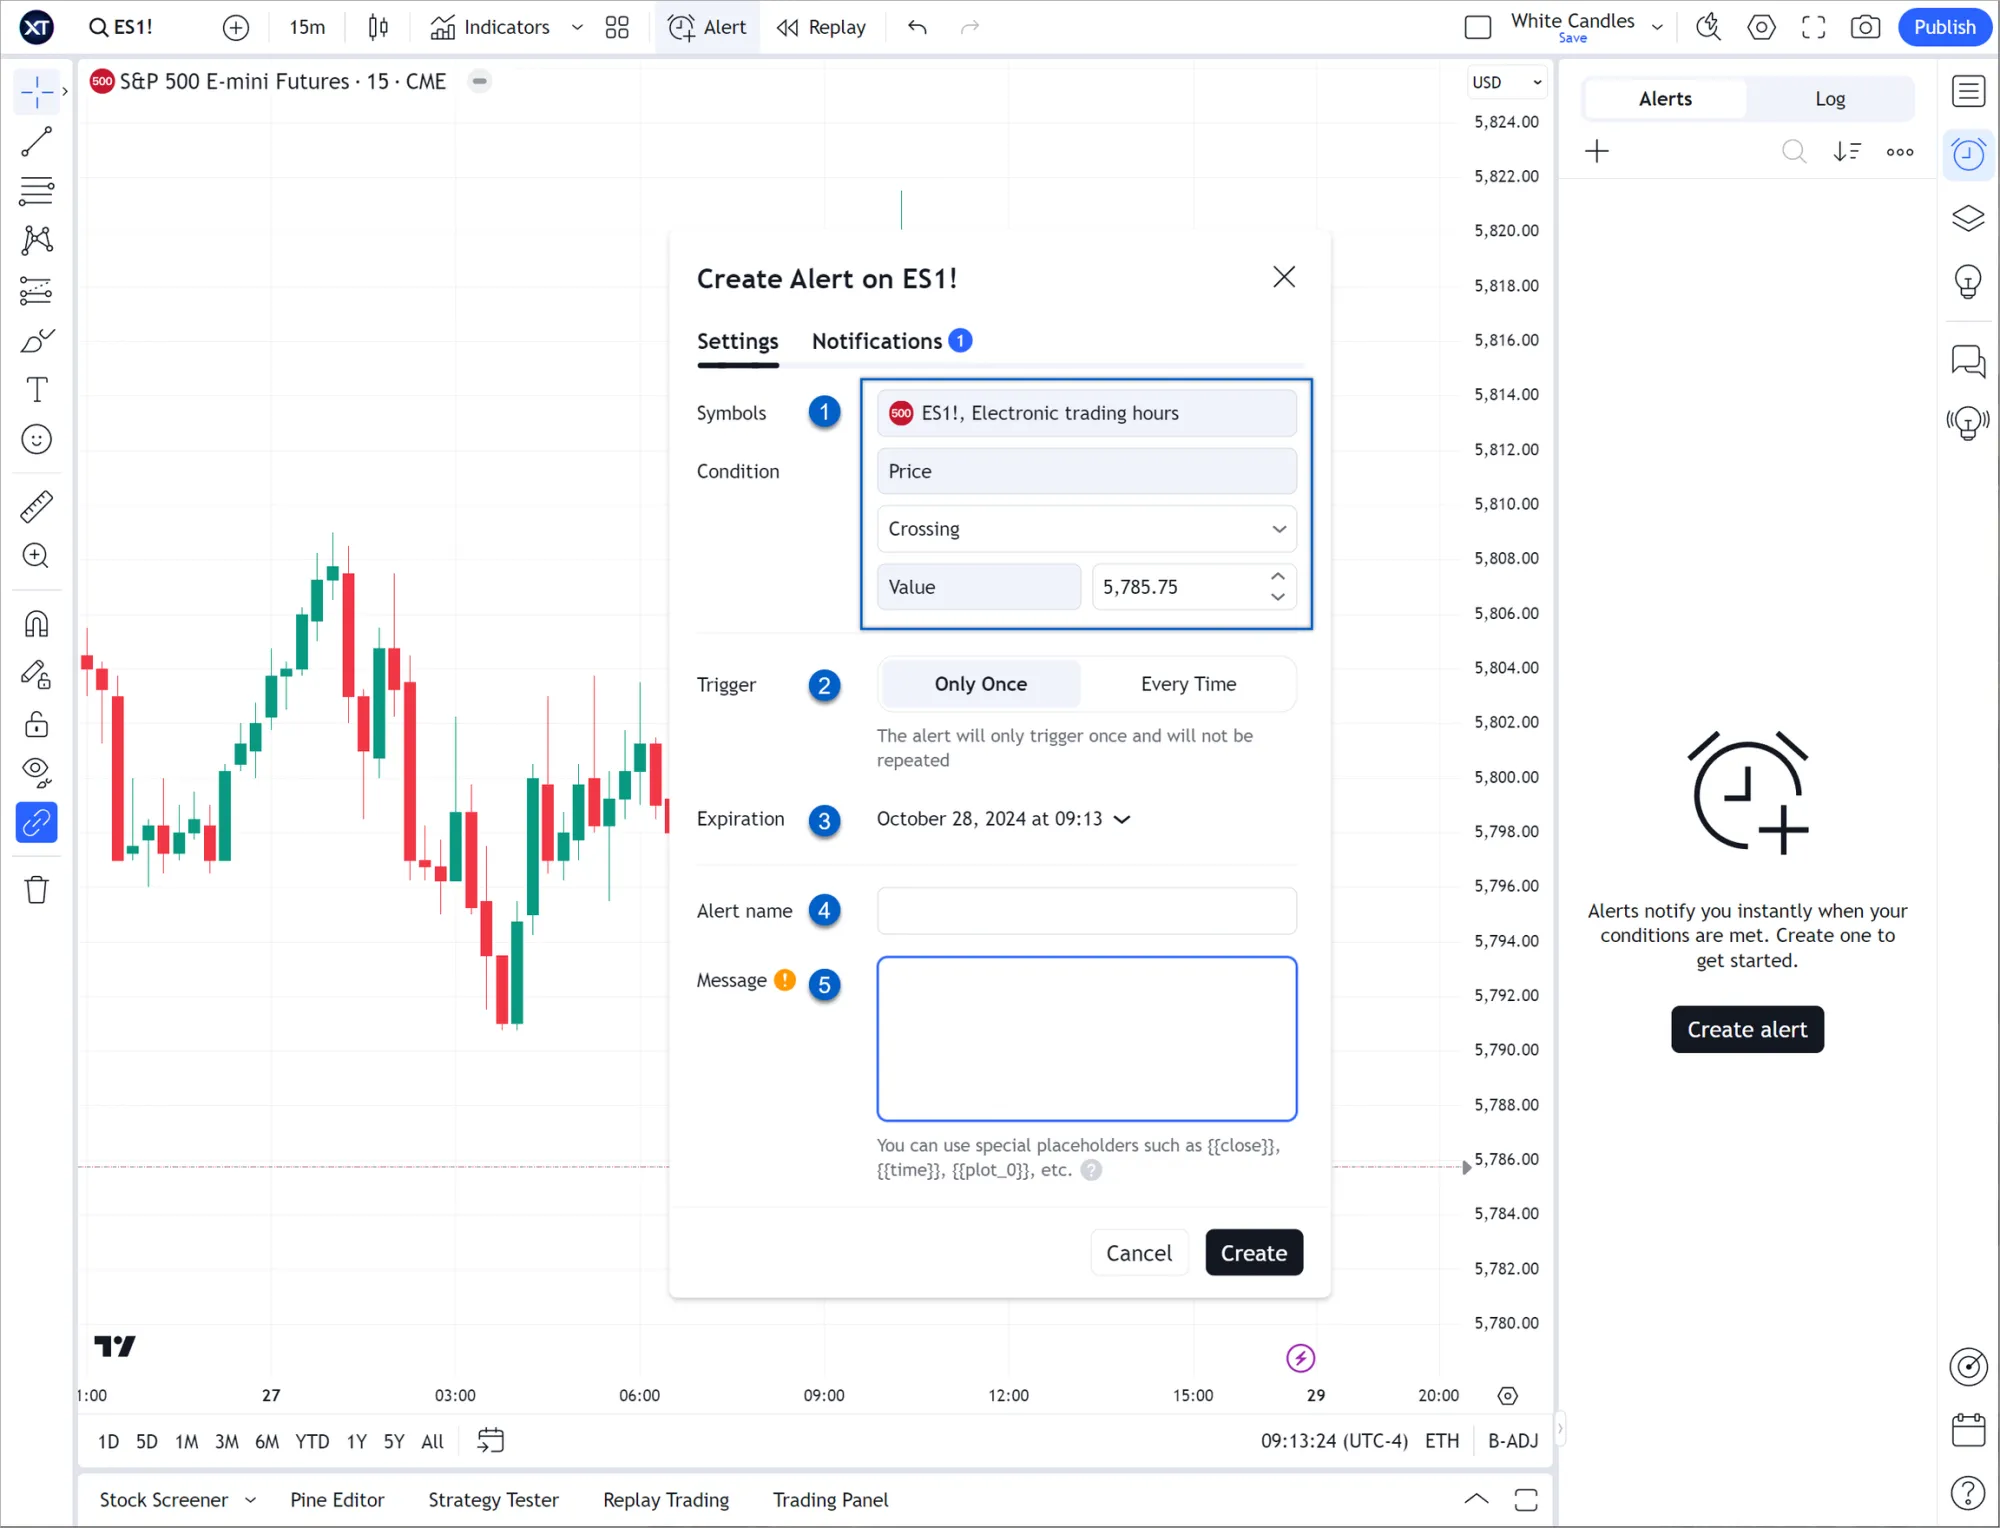
- Paste Your CrossTrade Alert Message – Copy and paste the structured alert message you want to communicate with NinjaTrader for trade execution. Here is an example of a basic market buy order through a PLACE command for 1 contract of MBT Micro Bitcoin futures on the March 2025 contract.
key=your-secret-key;
command=PLACE;
account=sim101;
instrument=MBT1!;
action=BUY;
qty=1;
order_type=MARKET;
tif=DAY;
CrossTrade Buy Command
Once an alert triggers, it will be sent to CrossTrade, which processes the order and forwards it to NinjaTrader 8.
- Save the Alert – Click ‘Create’ to activate your automated alerts.
Step 3: Executing Trades in NinjaTrader 8
After CrossTrade forwards the orders, NinjaTrader 8 will execute them on your linked Bitcoin futures trading account.
- Verify Incoming Orders – Check the ‘Orders’ tab in NinjaTrader 8 to confirm that trades are being placed as expected.
- Monitor Performance – Use NinjaTrader’s built-in analytics to track your trade execution and performance.
- Review Alert History – The Alert History page inside of your CrossTrade account provides an in-depth look at all the trading alerts you’ve sent to CrossTrade, giving you key insights into their execution process.
✅ Track All Sent Alerts – View a list of all trading alerts you've sent through CrossTrade.
✅ Check Execution Status – Instantly see whether an alert was successfully processed or if it encountered an issue.
✅ Search & Filter Alerts – Find specific alerts using the improved search function, making it easier to locate past trades.
✅ Analyze Execution Time – See exactly when CrossTrade received the alert and how long it took to forward it to NinjaTrader (NT).
✅ Multi-Account Order Tracking – If your order request was part of a multi-account placement order (e.g.,account=Sim101,Sim101,etc;), you can automatically retrieve all associated alerts by clicking on the Multi-Account ID.
Why Trade Bitcoin Futures Instead of Spot BTC?
Before diving into the trading process, let’s understand why BTC futures are a popular alternative to spot trading:
- Leverage – Trade BTC with greater exposure without needing to own the full value of a Bitcoin.
- Liquidity – Bitcoin futures, especially CME contracts, offer deeper liquidity compared to many spot exchanges.
- Regulated Market – Unlike unregulated crypto exchanges, CME Bitcoin futures trade on a regulated platform, reducing counterparty risk.
- Hedging Opportunities – Traders can use BTC futures to hedge against Bitcoin price fluctuations.
Bitcoin futures offer a structured and regulated way to trade BTC with leverage, liquidity, and advanced order management. By setting up webhook alerts, configuring CrossTrade, and enabling NinjaTrader 8, you can create a fully automated trading system that executes orders efficiently.
If you’re ready to take your Bitcoin futures trading to the next level, set up your CrossTrade account today!
